Connecting EmotiBit's ESP32-based Board and Streaming Live Sensor Data with Fathym OpenBiotech

In this tutorial, we will be taking an EmotiBit (An ESP32-based health monitoring board), reading its multiple data streams, and send real-time messages to OpenBiotech.
Things you will need
- EmotiBit Bundle info
EmotiBit Bundle can be purchased at: https://shop.openbci.com/products/all-in-one-emotibit-bundle
- A Windows computer/laptop PC operating systemnote
Program only functions for Windows OS currently.
- Arduino IDEinfo
Arduino IDE application can be downloaded here: https://www.arduino.cc/en/software
- Fathym OpenBiotech accountinfo
Sign up for OpenBiotech here: https://www.openbiotech.co/
Part 1 - Hooking Up Your Hardware
First, we need to attach the male headers of the ESP32 board to the EmotiBit sensor board. For more info on how to do this, look at the "Stack Your EmotiBit" section of this tutorial.
Only follow the "Stack your EmotiBit" section, we will be using a different approach to install/update our firmware.
Part 2 - Installing Arduino IDE and Necessary Software
Next, we will need to install all of the required software/libraries on your computer.
Installing Arduino IDE
Download your version of Arudino IDE here. Follow all of the steps in the wizard to complete installation (You can keep all of the default options the same).
Add Sensor Libraries
Once that is complete, we need to install some libraries. Click the following links to download each zip folder.
Download the ESP32 Azure IoT Arduino Library (ZIP)
Download the Adafruit IS31FL3731 Library (ZIP)
Once you have downloaded those, go to your Arduino IDE screen. In the top toolbar, select Sketch -> Include Library -> Add .ZIP Library, as shown below:
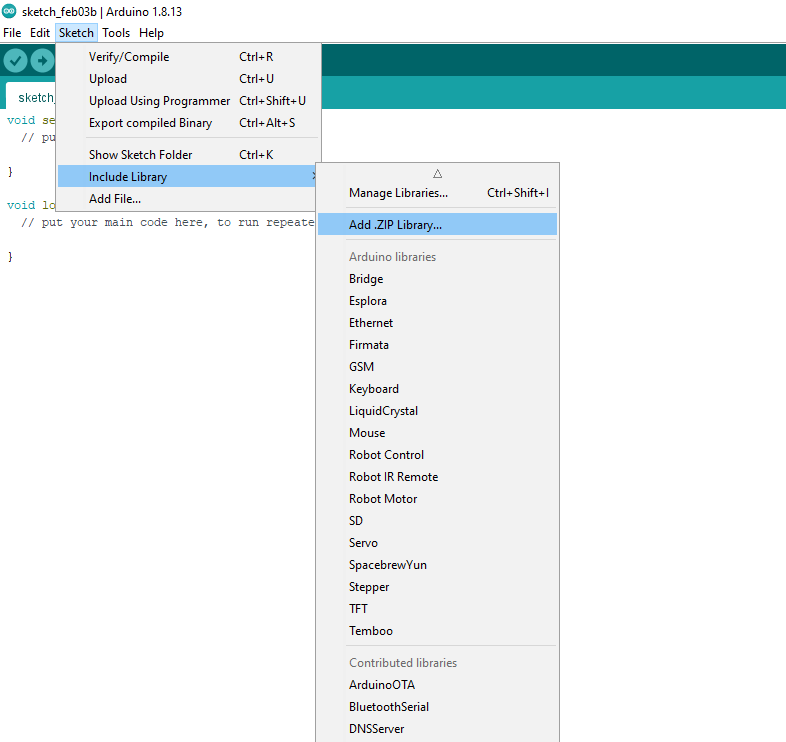
This will open a file browser. Navigate to your downloaded package, select the zip folder, and click "Open". Repeat this step for the second package.
Add Additional Library
In the top toolbar navigate to Tools -> Manage Libraries. On the next screen, type "NTPClient" into the search bar. A library with the same name should show up in the list. Click "Install", and then "Close".
Add ESP32 Board Definition
In order for us to work with the ESP32, we need to add a board "definition".
- Copy the following link:
https://dl.espressif.com/dl/package_esp32_index.json
- Back in your Arduino IDE, in the top toolbar, click File -> Preferences. You will be taken to the follow screen:
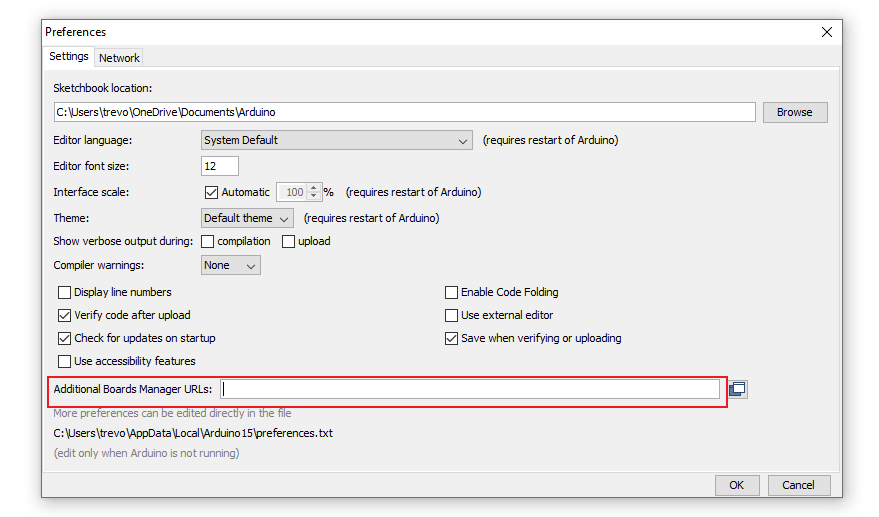
Take the link from the previous step, and paste it into the "Additional Boards Manager URLs" field (highlighted above in red). Click "OK".
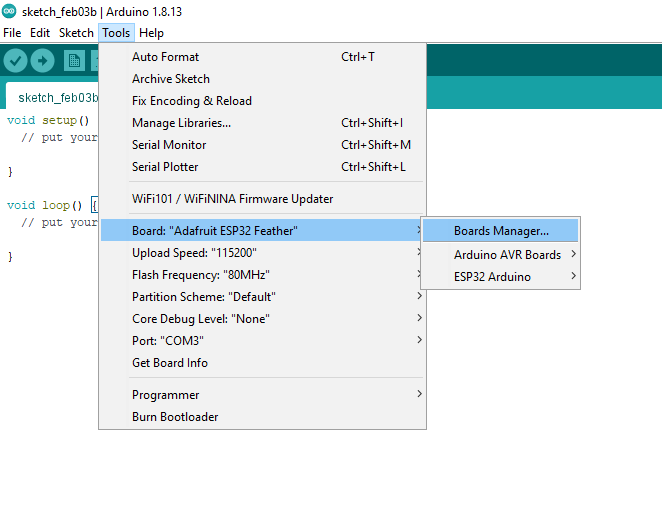
- Next, in the top toolbar, click Tools -> Board: "Name of Board" -> Boards Manager..., as shown below:
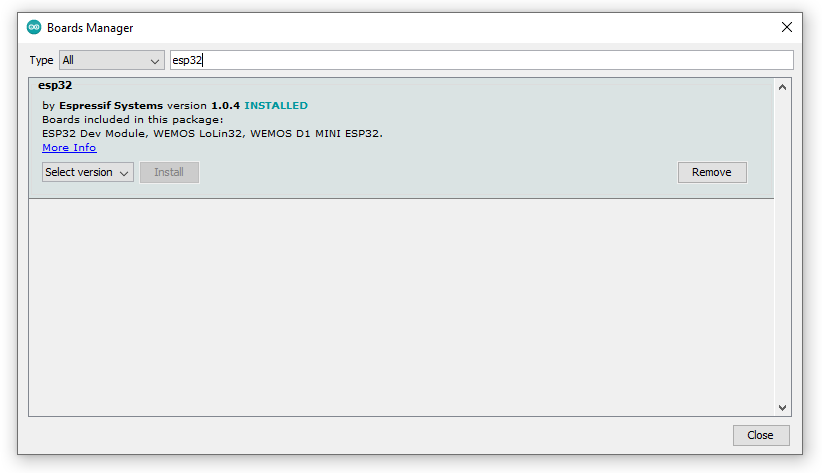
In the next screen, type "esp32" into the search bar. A board definition with the same name will appear, click "Install", then click "Close" (as shown below).
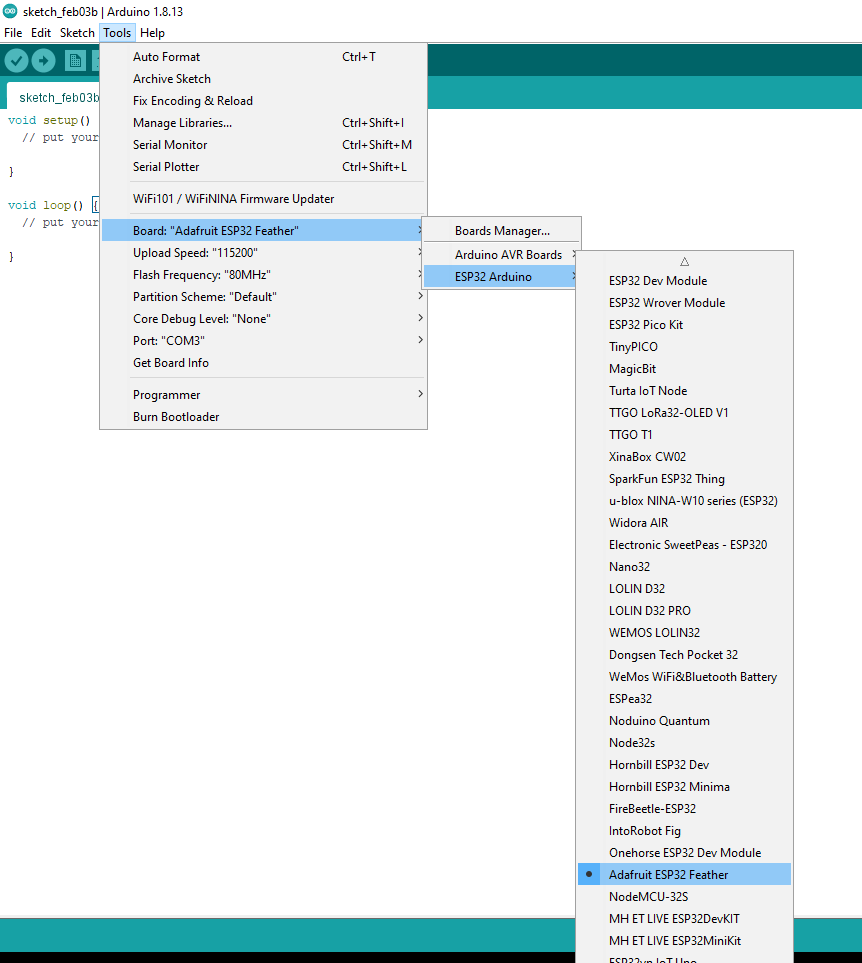
- Next, navigate to Tools -> Board: "Name of Board" -> ESP32 Arduino and select Adafruit ESP32 Feather, as shown below:
Part 3 - Determine Communication Port Number
Now that we have all the necessary libraries and dependencies, we need to tell Arduino IDE which port to use to communicate with your ESP32.
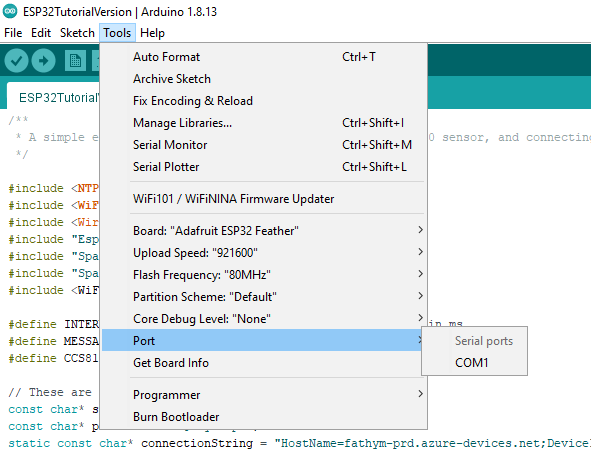
- Before plugging in the ESP32 to your computer, click Tools -> Port in the top toolbar of Arduino IDE. This will display a list of ports that are currently being used. Generally, there will only be one or two ports listed, depending on what you have plugged into your computer. Take note of the ports in this list. The picture below shows a list of ports before the ESP32 board is plugged in.
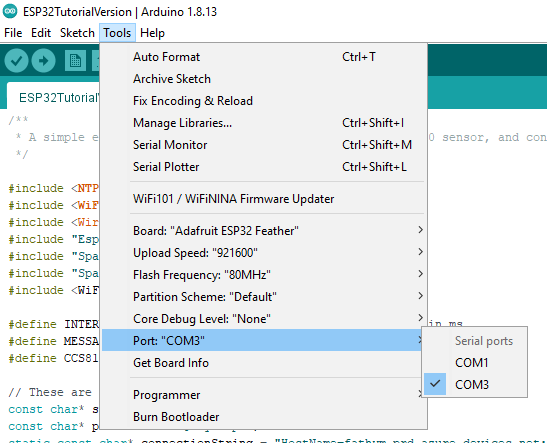
- Next, plug your ESP32 board directly into one of your computer's USB ports. After this, follow the previous step to view the list of available ports. You should now see an additional port that wasn't in the list before. This is the port that your ESP32 board is using. Click the port to select it. In the picture below, "COM3" is the port that is new in the list.
Part 4 - Get Code Onto your ESP32 board
Now that your Arduino can talk to your ESP32, it's time to put some code on your board!
First, copy the following code:
#include "Esp32MQTTClient.h"
#include "EmotiBit.h"
#include "time.h"
#include "EmotiBitVersionController.h"
#include "EmotiBitVariants.h"
// #include "EmotiBitNvmController.h"
// #include <Wire.h>

#define SerialUSB SERIAL_PORT_USBVIRTUAL                                 // Required to work in Visual Micro / Visual Studio IDE
#define BATCH_SIZE (10)                                                  // The number of messages to batch into a single call
#define HUB_MESSAGE_MAX_LEN (1000 * 30)                                  // Set to max size of IoT Hub Messages (256 KB)
#define PAYLOAD_MAX_SIZE (HUB_MESSAGE_MAX_LEN / BATCH_SIZE)              // The max size of a single payload ~5kb
#define PAYLOADS_MAX_SIZE (HUB_MESSAGE_MAX_LEN - (PAYLOAD_MAX_SIZE * 3)) // The maximum size of all collected payloads
const uint32_t SERIAL_BAUD = 2000000;    // 115200

EmotiBit emotibit;
EmotiBitVersionController emotibitVersionController;
EmotiBitVersionController::EmotiBitVersion emotibitVersion;
String version;

TaskHandle_t ReadTask;
TaskHandle_t CaptureTask;

StaticJsonDocument<1024> config;
unsigned long epochTime;
const char *ntpServer = "pool.ntp.org";

StaticJsonDocument<1024> lastLoopStartMillisDoc;
JsonObject lastLoopStartMillis;
StaticJsonDocument<HUB_MESSAGE_MAX_LEN> payloadsDoc;
JsonArray payloads = payloadsDoc.to<JsonArray>();
StaticJsonDocument<PAYLOAD_MAX_SIZE> payloadDoc;
JsonObject payload = payloadDoc.to<JsonObject>();
StaticJsonDocument<HUB_MESSAGE_MAX_LEN> payloadCapturesDoc;
JsonArray payloadCaptures = payloadCapturesDoc.to<JsonArray>();

const size_t dataSize = EmotiBit::MAX_DATA_BUFFER_SIZE;
float data[dataSize];
String fathymDeviceID;
char fathymReadings[18][3] = {{}};
int readingsInterval;

int captureInterval;
long captureTracking = 0;
String fathymConnectionStringPtr;
long lastCapture = 0;

bool readingLogs = false;
bool captureLogs = false;

void setup()
{
  Serial.begin(SERIAL_BAUD);
  Serial.println("Serial started");
  delay(2000); // short delay to allow user to connect to serial, if desired

  version = EmotiBitVersionController::getHardwareVersion(emotibitVersion);

  // Capture the calling ino into firmware_variant information
  String inoFilename = __FILE__;
  inoFilename = (inoFilename.substring((inoFilename.indexOf(".")), (inoFilename.lastIndexOf("\\")) + 1));

  emotibit.setup(inoFilename);

  emotibit.attachShortButtonPress(&onShortButtonPress);
  emotibit.attachLongButtonPress(&onLongButtonPress);

  if (!loadConfigFile(emotibit._configFilename))
  {
    Serial.println("SD card configuration file parsing failed.");
    Serial.println("Create a file 'config.txt' with the following JSON:");
    Serial.println("{\"WifiCredentials\": [{\"ssid\": \"SSSS\", \"password\" : \"PPPP\"}],\"Fathym\":{\"ConnectionString\": \"xxx\", \"DeviceID\": \"yyy\"}}");
  }

  loadLastLoopStartMillis();

  Serial.println("#################################");
  Serial.println("# Open Biotech Real Time Stream #");
  Serial.println("#################################");

  xTaskCreatePinnedToCore(ReadTaskRunner, "ReadTask", 10000, NULL, 1, &ReadTask, 0);
  xTaskCreatePinnedToCore(CaptureTaskRunner, "CaptureTask", 10000, NULL, 1, &CaptureTask, 1);
}

void loop()
{
  vTaskDelete(NULL);
  // TODO: Device Health Monitoring, cloud-to-device message handling, device twin syncing?
}

void ReadTaskRunner(void *pvParameters)
{
  readingLogs &&Serial.print("ReadTask running on core ");
  readingLogs &&Serial.println(xPortGetCoreID());

  delay(500);

  for (;;)
  {
    readingLogs &&Serial.println("ReadTask loop running");

    emotibit.update();

    ReadTaskLoop();

    readingLogs &&Serial.print("ReadTask loop complete, delaying for ");
    readingLogs &&Serial.println(readingsInterval);

    delay(readingsInterval);
  }
}

void ReadTaskLoop()
{
  payload["DeviceID"] = fathymDeviceID;

  payload["DeviceType"] = "emotibit";

  JsonObject payloadDeviceData = payload.createNestedObject("DeviceData");

  JsonObject payloadSensorReadings = payload.createNestedObject("SensorReadings");

  epochTime = getTime();

  payloadDeviceData["Timestamp"] = String(epochTime);

  JsonObject payloadSensorMetadata = payload.createNestedObject("SensorMetadata");

  float battVolt = emotibit.readBatteryVoltage();

  payloadSensorMetadata["BatteryPercentage"] = emotibit.getBatteryPercent(battVolt);

  payloadSensorMetadata["MACAddress"] = emotibit.getFeatherMacAddress();

  payloadSensorMetadata["EmotibitVersion"] = version;

  bool hasReadings = false;

  for (String typeTag : fathymReadings)
  {
    if (typeTag != NULL)
    {
      readingLogs &&Serial.print("Reading type ");
      readingLogs &&Serial.println(typeTag);

      enum EmotiBit::DataType dataType = loadDataTypeFromTypeTag(typeTag);

      long loopStartMillis = lastLoopStartMillis[typeTag];

      uint32_t timestamp;
      size_t dataAvailable = emotibit.readData((EmotiBit::DataType)dataType, &data[0], dataSize, timestamp);

      lastLoopStartMillis[typeTag] = timestamp;

      if (dataAvailable > 0 && loopStartMillis > 0)
      {
        hasReadings = true;

        readingLogs &&Serial.print(dataAvailable);
        readingLogs &&Serial.print(" data record(s) available reading type ");
        readingLogs &&Serial.println(typeTag);

        long elapsedMillis = timestamp - loopStartMillis;

        JsonArray payloadSensorTypeReadings = payloadSensorReadings.createNestedArray(typeTag);

        for (size_t i = 0; i < dataAvailable && i < dataSize; i++)
        {
          readingLogs &&Serial.print("Reading data record ");
          readingLogs &&Serial.print(i);
          readingLogs &&Serial.print(" for ");
          readingLogs &&Serial.print(typeTag);
          readingLogs &&Serial.println(": ");

          JsonObject reading = payloadSensorTypeReadings.createNestedObject();

          reading["Data"] = data[i];

          float millis = (float(i + 1) / float(dataAvailable)) * float(elapsedMillis);

          reading["Millis"] = round2(millis);

          readingLogs &&serializeJson(reading, Serial);
          readingLogs &&Serial.println("");
        }
      }
    }
  }

  if (hasReadings)
  {
    readingLogs &&Serial.println("Queuing payload for capture: ");

    //  Ensure payload is as small as possible before adding to capture set
    // payload.shrinkToFit();

    readingLogs &&Serial.print("Payload Memory Usage: ");
    readingLogs &&Serial.println(payload.memoryUsage());

    payloads.add(payload);

    readingLogs &&serializeJson(payload, Serial);
    readingLogs &&Serial.println("");
  }

  payloadDoc.clear();
  payloadDoc.garbageCollect();
}

void CaptureTaskRunner(void *pvParameters)
{
  captureLogs &&Serial.print("CaptureTask running on core ");
  captureLogs &&Serial.println(xPortGetCoreID());

  const char *connStr = fathymConnectionStringPtr.c_str();

  if (!Esp32MQTTClient_Init((const uint8_t *)connStr, true))
  {
    captureLogs &&Serial.println("Initializing IoT hub failed.");
    return;
  }

  configTime(0, 0, ntpServer);

  delay(500);

  for (;;)
  {
    Serial.print("Calculating CaptureTask loop run with ");

    float allocatedMemory = payloadsDoc.memoryUsage();

    captureLogs &&Serial.print("allocated memory ");
    captureLogs &&Serial.print(allocatedMemory);

    bool isMemoryAllocated = allocatedMemory >= PAYLOADS_MAX_SIZE;

    captureLogs &&Serial.print(" and capture tracking ");
    captureLogs &&Serial.println(captureTracking);

    bool isCaptureInterval = captureTracking >= captureInterval;

    if (isCaptureInterval || isMemoryAllocated)
    {
      captureLogs &&Serial.print("CaptureTask loop running due to ");

      if (isMemoryAllocated)
      {
        captureLogs &&Serial.print("memory allocated");
      }
      else if (isCaptureInterval)
      {
        captureLogs &&Serial.print("capture interval");
      }

      CaptureTaskLoop();

      captureLogs &&Serial.println("CaptureTask loop complete");

      captureTracking = 0;

      lastCapture = millis();
    }
    else
    {
      captureTracking = millis() - lastCapture;

      //  Small delay to space out capture tracking checks
      delay(10);
    }
  }
}

void CaptureTaskLoop()
{
  //  Fill array for processing captures
  payloadCaptures.set(payloads);

  //  Immediately clear payloads so that new payloads can be read
  payloadsDoc.clear();
  payloadsDoc.garbageCollect();

  for (JsonVariant payloadCapture : payloadCaptures)
  {
    char messagePayload[PAYLOAD_MAX_SIZE];

    captureLogs &&serializeJson(payloadCapture, messagePayload);

    captureLogs &&Serial.println("Capturing payload: ");

    EVENT_INSTANCE *message = Esp32MQTTClient_Event_Generate(messagePayload, MESSAGE);

    captureLogs &&Serial.println(messagePayload);

    Esp32MQTTClient_SendEventInstance(message);

    captureLogs &&Serial.println("Payload captured");
  }

  payloadCapturesDoc.clear();
  payloadCapturesDoc.garbageCollect();
}

// Loads the configuration from a file
bool loadConfigFile(const char *filename)
{
  File file = SD.open(filename);

  if (!file)
  {
    Serial.print("File ");
    Serial.print(filename);
    Serial.println(" not found");
    return false;
  }

  Serial.print("Parsing: ");
  Serial.println(filename);

  deserializeJson(config, file, DeserializationOption::NestingLimit(3));

  JsonArray readingValues = config["Fathym"]["Readings"].as<JsonArray>();

  const char *readings[18];

  Serial.println(readingValues.size());
  copyArray(readingValues, readings);

  for (int i = 0; i < readingValues.size(); i++)
  {
    strcpy(fathymReadings[i], readings[i]);
  }

  if (config.isNull())
  {
    Serial.println(F("Failed to parse config file"));
    return false;
  }

  fathymConnectionStringPtr = config["Fathym"]["ConnectionString"].as<String>();

  fathymDeviceID = config["Fathym"]["DeviceID"].as<String>();

  readingsInterval = config["Fathym"]["ReadingInterval"] | 10;

  readingLogs = config["Fathym"]["ShowReadingLogs"] | false;

  captureInterval = config["Fathym"]["CaptureInterval"] | 5000;

  captureLogs = config["Fathym"]["ShowCaptureLogs"] | false;

  file.close();

  Serial.println("Serialized Config: ");
  serializeJson(config, Serial);
  Serial.println("");
  Serial.print("Config memory usage: ");
  Serial.println(config.memoryUsage());

  return true;
}

EmotiBit::DataType loadDataTypeFromTypeTag(String typeTag)
{
  if (typeTag == "AX")
    return EmotiBit::DataType::ACCELEROMETER_X;
  else if (typeTag == "AY")
    return EmotiBit::DataType::ACCELEROMETER_Y;
  else if (typeTag == "AZ")
    return EmotiBit::DataType::ACCELEROMETER_Z;
  else if (typeTag == "GX")
    return EmotiBit::DataType::GYROSCOPE_X;
  else if (typeTag == "GY")
    return EmotiBit::DataType::GYROSCOPE_Y;
  else if (typeTag == "GZ")
    return EmotiBit::DataType::GYROSCOPE_Z;
  else if (typeTag == "MX")
    return EmotiBit::DataType::MAGNETOMETER_X;
  else if (typeTag == "MY")
    return EmotiBit::DataType::MAGNETOMETER_Y;
  else if (typeTag == "MZ")
    return EmotiBit::DataType::MAGNETOMETER_Z;
  else if (typeTag == "EA")
    return EmotiBit::DataType::EDA;
  else if (typeTag == "EL")
    return EmotiBit::DataType::EDL;
  else if (typeTag == "ER")
    return EmotiBit::DataType::EDR;
  else if (typeTag == "H0")
    return EmotiBit::DataType::HUMIDITY_0;
  else if (typeTag == "T0")
    return EmotiBit::DataType::TEMPERATURE_0;
  else if (typeTag == "TH")
    return EmotiBit::DataType::THERMOPILE;
  else if (typeTag == "PI")
    return EmotiBit::DataType::PPG_INFRARED;
  else if (typeTag == "PR")
    return EmotiBit::DataType::PPG_RED;
  else if (typeTag == "PG")
    return EmotiBit::DataType::PPG_GREEN;
}

void loadLastLoopStartMillis()
{
  Serial.println("Initializing last loop start millis for tracking");

  lastLoopStartMillis = lastLoopStartMillisDoc.to<JsonObject>();

  JsonArray readingValues = config["Fathym"]["Readings"].as<JsonArray>();

  for (JsonVariant readingValue : readingValues)
  {
    lastLoopStartMillis[readingValue.as<String>()] = millis();
  }
}

// Function that gets current epoch time
unsigned long getTime() {
  time_t now;
  struct tm timeinfo;
  if (!getLocalTime(&timeinfo)) {
    //Serial.println("Failed to obtain time");
    return(0);
  }
  time(&now);
  return now;
}

void onShortButtonPress()
{
  // toggle wifi on/off
  if (emotibit.getPowerMode() == EmotiBit::PowerMode::NORMAL_POWER)
  {
    emotibit.setPowerMode(EmotiBit::PowerMode::WIRELESS_OFF);
    Serial.println("PowerMode::WIRELESS_OFF");
  }
  else
  {
    emotibit.setPowerMode(EmotiBit::PowerMode::NORMAL_POWER);
    Serial.println("PowerMode::NORMAL_POWER");
  }
}

void onLongButtonPress()
{
  emotibit.sleep();
}

float round2(float value) {
   return (int)(value * 100 + 0.5) / 100.0;
}
Next, in the ArduinoIDE, delete the existing template code. Then, paste the code you just copied.
Next, we will need to add the necessary config file to your EmotiBit's SD card, as well as register your EmotiBit device with Fathym OpenBiotech.
Part 5 - Configuring Fathym OpenBiotech
Before we can tell your device where to send data, we first need somewhere to send the data. OpenBiotech facilitates streaming device data to the cloud. Here we are using Azure IoT Hub to connect devices to a data flow and make device data available for use downstream in other applications and services.
Follow the Getting Started steps to create a new enterprise, create a Device and flow Data.
From the "Data" section, you should see a Connection String for your newly created device. Copy this value for later use.
Add Config file to your EmotiBit
Next, we will need to create a config file on your EmotiBit's SD card, and fill in the appropriate values.
First, remove the SD card from your EmotiBit device, and plug it into your PC. Next, navigate to the SD card's directory on your PC, and add a new file called "config.txt". In this file, copy and paste the following template:
{"WifiCredentials": [{"ssid": "MyNetworkName", "password" : "*******"}],"Fathym":{"ConnectionString" : "HostName=**YourHostName**;DeviceId=**YourDeviceID**;SharedAccessKey=**YourDeviceKey**", "DeviceID": "Emotibit", "ReadingInterval": 50, "CaptureInterval": 5000, "ShowReadingLogs": false, "ShowCaptureLogs": false, "Readings": ["EA", "EL", "ER", "PI", "PR", "PG", "TH"]}}
Once you have this file created, you can now start to fill in the necessary values.
First, fill in the WiFi SSID name and password of the network you plan on using.
With this particular ESP32 board, it can only connect to 2.4 Ghz Wifi networks. The board CAN NOT connect to 5 Ghz networks. If you attempt to connect to a 5 Ghz network, this code will not work.
Next, take your connection string that you copied from the previous step, and paste it into the "ConnectionString" variable.
Next, take the YourDeviceID portion of your connection string, and paste it into the "DeviceID" variable.
Other Config values
- ReadingInterval - The amount of time (in milliseconds) between each reading of device data
- CaptureInterval - The amount of time (in milliseconds) between the sending of batched data to OpenBiotech
- ShowReadingLogs - When set to True, shows the logs in the serial montior related to the polling of raw data from the EmotiBit
- ShowCaptureLogs - When set to True, shows the logs in the serial montior related to the batching and sending of data to OpenBiotech
- Readings - An array of "TypeTags", which define the types of readings you would like to capture. The defined typeTags can be found below:
- AX - Accelerometer X-axis
- AY - Accelerometer Y-axis
- AZ - Accelerometer Z-axis
- GX - Gyroscope X-axis
- GY - Gyroscope Y-axis
- GZ - Gyroscope Z-axis
- MX - Magnetometer X-axis
- MY - Magnetometer Y-axis
- MZ - Magnetometer Z-axis
- EA - EDA
- EL - EDL
- ER - EDR
- H0 - Humidity
- T0 - Temperature
- TH - Thermopile
- PI - PPG Infrafred
- PR - PPG Red
- PG - PPG Green
Once you have set your values, save the config.txt file and remove the SD card from your PC. Place it back into your EmotiBit device.
Part 6 - Verify and Upload Your Code
Now it is time to bring your ESP32 to life! In the top left corner of the Arduino IDE, click the "Verify" button, which looks like a checkbox (shown below).
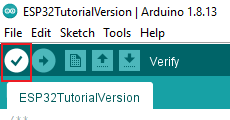
This will compile your code, and ensure that your code has no errors like missing libraries or incorrect syntax.
Once this is complete, click on the "Upload" button, which looks like a horizontal arrow, and is right next to the "Verify" button (shown below).
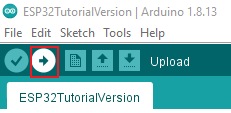
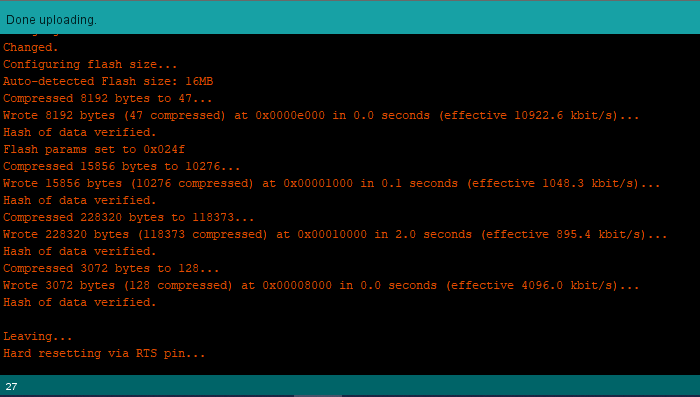
This will take your code, and flash it to the ESP32 board. You will see some red text outputted to the terminal on the bottom of the screen. The toolbar will say "Done Uploading" once complete, and should look something like this:
Your ESP32 should now be taking sensor readings, and sending the information up to OpenBiotech. If you want to see a live view of your code running, click Tools -> Serial Monitor in the top toolbar. You should be able to see your sensor readings every 30 seconds. In the Serial Monitor window, make sure that you have the baud rate set to "2000000".
Once you confirm that messages are sending correctly, you can now go to OpenBiotech and see your messages in real time.
Part 7 - Understanding the EmotiBit Data Payloads
If you have done everything correctly, your payloads should look something like this:
{
  "DeviceID": "Emotibit",
  "DeviceType": "emotibit",
  "DeviceData": {
    "Timestamp": "1716321766"
  },
  "SensorReadings": {
    "EA": [
      {
        "Data": 0.030178608,
        "Millis": 62.5
      },
      {
        "Data": 0.03017848,
        "Millis": 125
      }
    ],
    "EL": [
      {
        "Data": 26540.80078,
        "Millis": 62.5
      },
      {
        "Data": 26541,
        "Millis": 125
      }
    ],
    "PI": [
      {
        "Data": 3102,
        "Millis": 46.66666794
      },
      {
        "Data": 3119,
        "Millis": 93.33333588
      },
      {
        "Data": 3106,
        "Millis": 140
      }
    ],
    "PR": [
      {
        "Data": 3768,
        "Millis": 46.66666794
      },
      {
        "Data": 3768,
        "Millis": 93.33333588
      },
      {
        "Data": 3774,
        "Millis": 140
      }
    ],
    "PG": [
      {
        "Data": 690,
        "Millis": 46.66666794
      },
      {
        "Data": 680,
        "Millis": 93.33333588
      },
      {
        "Data": 689,
        "Millis": 140
      }
    ],
    "TH": [
      {
        "Data": 23.64787674,
        "Millis": 133
      }
    ]
  },
  "SensorMetadata": {
    "BatteryPercentage": 100,
    "MACAddress": "*********",
    "EmotibitVersion": "V01b"
  }
}
At the top you will see your DeviceID as well as a timestamp represented in epoch time.
Next, under the "SensorReadings" section, you will see an object for each of the typetags you set in the config file. Each typetag will contain an array of readings. Each reading will have a "Data" value (the actual value from the emotibit) and a "Millis" value. The "Millis" value is the time difference between the timestamp value and the time that the actual sensor was polled.